






How to Fix Garage Door Sensors: 7 Fixes That Actually Work
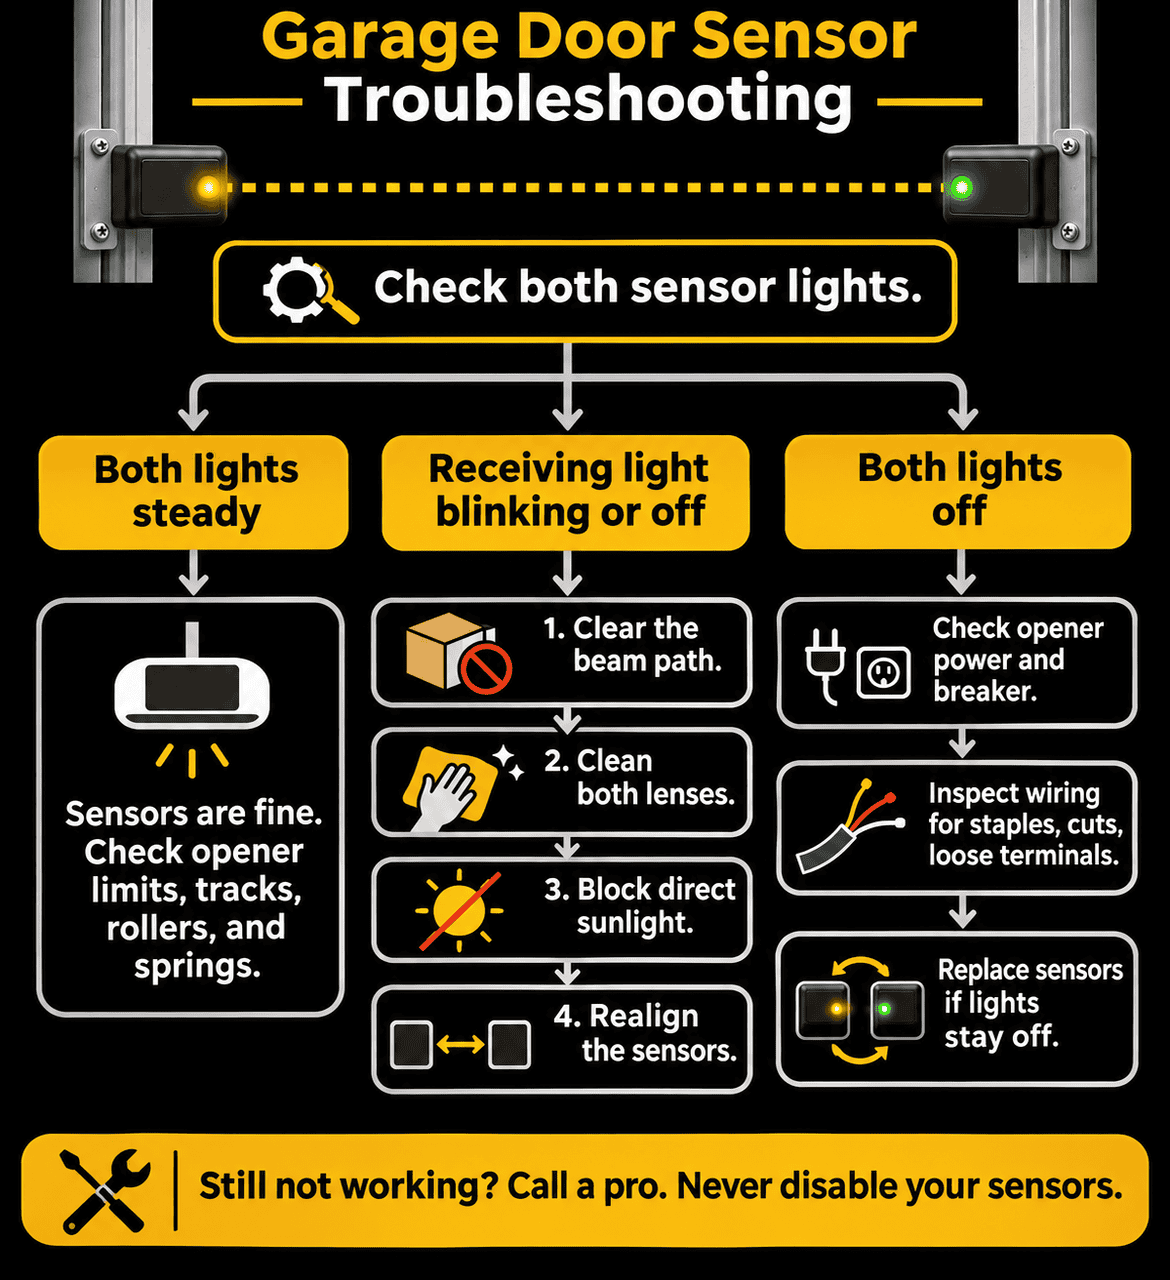
Short answer: To fix garage door sensors, start by reading the indicator lights on both sensors. Then work through the fixes in order: clear anything blocking the beam, clean both lenses, shade the receiving sensor from direct sunlight, realign the sensors until both lights glow steady, inspect the low-voltage wiring for staples, cuts, or loose terminals, and confirm the opener has power. If the lights still won’t come on or hold steady after all of that, the sensors likely need to be replaced.
Key Takeaways
- Your sensors’ indicator lights are the fastest diagnostic tool you have. Read them before you change anything.
- Most sensor problems come from obstructions, dirty lenses, sun glare, or misalignment, and all four are safe DIY fixes.
- If both sensor lights are off, suspect power or wiring before you suspect the sensors themselves.
- Holding the wall button closes the door temporarily, but never disable or remove the sensors. They’re a federally required safety device.
- If the sensor lights are steady and the door still reverses, the problem is in the opener settings or the door hardware, not the sensors.
- Test the door’s safety reversal after any sensor repair, and again every month.
Table of Contents
- How Garage Door Sensors Work
- Signs Your Garage Door Sensors Need Fixing
- Start Here: What Your Sensor Lights Are Telling You
- How to Fix Garage Door Sensors: 7 Fixes in Order
- How to Close Your Door While the Sensors Are Down
- When the Sensors Aren’t the Real Problem
- When to Call a Professional
- How to Keep Your Sensors Working
- Frequently Asked Questions
- Get Reliable Garage Door Sensor Repair
How Garage Door Sensors Work
Your garage door has two safety sensors (also called photo eyes) mounted near the floor on either side of the door. One sends an invisible infrared beam across the opening. The other receives it. When the beam is connected, the opener knows the path is clear. When something interrupts the beam while the door is closing, the opener stops and reverses the door.
Because the opener can’t tell the difference between a child standing in the doorway and a cobweb on a lens, anything that interrupts the beam will keep the door from closing. That’s by design. The U.S. Consumer Product Safety Commission has required external entrapment protection, such as an electric eye, on residential openers manufactured since January 1, 1993. So the goal is never to get around the sensors. It’s to find out what’s interrupting the beam and fix it.
Signs Your Garage Door Sensors Need Fixing
- The door starts closing, then stops and goes back up.
- The door won’t close from the remote, keypad, or app.
- The opener’s lights flash or blink when you try to close the door.
- One or both sensor lights are blinking, flickering, or off.
- The door only closes when you hold down the wall button.
- The door works fine some days and not others, or only fails at certain times of day.
Start Here: What Your Sensor Lights Are Telling You
Look at the small light on each sensor before you do anything else. On LiftMaster and Chamberlain systems, the sending sensor has an amber light and the receiving sensor has a green light. Genie Safe-T-Beam systems use a red light on the sender and a green light on the receiver.
| What You See | What It Usually Means | Start With |
|---|---|---|
| Both lights solid and steady | Sensors are working and seeing each other | Look beyond the sensors (see below) |
| Sending light solid, receiving light blinking or off | Beam is blocked, lens is dirty, sun glare, or misalignment | Fixes 1 through 4 |
| Genie red light blinking twice, pausing, repeating | Beam not aligned or obstructed | Fixes 1 through 4 |
| One light off, the other on | Wiring problem at the dark sensor, or a failing sensor | Fixes 5 and 7 |
| Both lights off | No power reaching the sensors | Fixes 6 and 5 |
Your opener gives you clues, too. On many LiftMaster and Chamberlain openers, the opener lights flash 10 times when there’s a safety sensor issue. If your opener has a diagnostic LED next to the learn button, Chamberlain notes that one flash points to a broken or disconnected sensor wire, while two flashes point to a shorted wire or reversed black and white wires. Genie publishes a similar Safe-T-Beam diagnostic chart.
How to Fix Garage Door Sensors: 7 Fixes in Order
Work through these in order. They’re arranged from the quickest, most common fixes to the least common, so you won’t rewire a sensor that only needed a wipe.
1. Clear Anything Blocking the Beam
The beam runs just a few inches off the floor, so it doesn’t take much to block it. Check for trash cans, recycling bins, bikes, toys, boxes, a broom leaning against the track, overgrown leaves, or a cobweb hanging in front of a lens. Also make sure nothing hanging from the door itself, like a loose weatherstrip, dips into the beam as the door comes down.
2. Clean the Sensor Lenses
Sensors live at floor level in one of the dustiest spots in your house. Dirt, pollen, spider webs, and water spots can scatter the beam enough to trigger a reversal.
- Wipe each lens gently with a soft, dry microfiber cloth.
- For stuck-on grime, lightly dampen the cloth with water. Avoid harsh chemicals or anything abrasive that could scratch or cloud the lens.
- Check the lenses for cracks or fogging inside the housing. Damaged lenses usually mean the sensor needs to be replaced.
3. Stop Sunlight Interference
If your door refuses to close at the same time every day, usually in the afternoon, the sun may be shining straight into the receiving sensor and drowning out the infrared beam. We see this often across Denton County on garages that face west.
Genie recommends keeping the green receiving sensor out of direct sunlight. Chamberlain’s troubleshooting guidance suggests switching the positions of the two sensors if the door still won’t close. Your options:
- Swap the sensors so the receiver sits on the shady side of the door.
- Add a sun shield or small hood over the receiving sensor.
- Test the door after sunset. If it works fine then, sun glare is almost certainly the culprit.
4. Realign the Sensors
Misalignment is the single most common sensor problem. A sensor only has to be bumped a few degrees by a car bumper, mower, or trash can for the beam to miss the receiver.
- Loosen the wing nut or mounting screw on the receiving sensor (the one with the green light).
- Slowly pivot it until it points straight at the sending sensor and the light glows solid and steady.
- Tighten it back down and recheck the light.
- Make sure both sensors sit at the same height. The Consumer Product Safety Commission recommends installing an electric eye 4 to 6 inches above the floor.
If a sensor got knocked far out of position or the light won’t settle, follow our full guide on how to align garage door sensors, including the string-and-level method and how to handle two-door crosstalk.
5. Inspect and Repair the Sensor Wiring
Each sensor connects to the opener’s motor unit with thin, low-voltage wire that runs up the wall or door frame. That wire gets pinched, chewed, stapled, and pulled loose more often than you’d think.
Unplug the opener before you inspect or touch any wiring. Then check for:
- Staples driven through the wire. A staple that pierces both conductors can short the circuit.
- Cuts, kinks, or chewed spots. Rodents and pets can damage wires along the floor or wall.
- Loose or corroded connections. Check where the wires connect at each sensor and at the terminals on the back of the opener. Gently tug each wire to make sure it’s seated.
- Reversed wires. On many Chamberlain-built openers, the white wires connect to the white terminal and the white/black wires to the black terminal. Pre-wired garages may use different colors.
If you find a damaged section, it can be spliced with proper connectors or replaced with new bell wire. If you’re not comfortable working with the wiring, this is a quick job for a technician.
6. Confirm the Opener Has Power
If both sensor lights are dark, the sensors may simply not be getting power. Make sure the opener is plugged in, the outlet works, and the breaker hasn’t tripped. If the opener itself has no lights or won’t run, the problem is upstream of the sensors.
Chamberlain’s guide for troubleshooting sensors when both lights are off walks through isolating whether the issue is the wiring, the sensors, or the opener. If the opener has power but still won’t send it to the sensors, the opener’s circuit board may be failing. That’s a job for professional garage door opener repair.
7. Replace the Sensors
Sensors don’t last forever. Cracked lenses, moisture inside the housing, or electronics that have simply worn out all mean it’s time for a new pair. Chamberlain’s own guidance is that if you’ve replaced the wiring and a sensor still won’t glow steady, the sensors should be replaced.
Replacement sensors must be compatible with your opener’s brand and model. Check the label on the motor unit or your owner’s manual before you buy. If your opener is old enough that compatible sensors are hard to find, it may make more sense to upgrade the whole opener. Our guide to garage door opener repair costs in Texas can help you weigh repair against replacement.
How to Close Your Door While the Sensors Are Down
Need to lock up before you can fix the sensors? You have two safe options:
- Hold the wall button. On many openers, pressing and holding the wall control closes the door even when the sensors can’t see each other. Chamberlain confirms you can close the door by holding the door control until it finishes traveling down. Keep holding until the door is fully closed, and watch the doorway the entire time.
- Close it manually. Pull the emergency release cord and lower the door by hand. Lock it with the manual slide lock if your door has one. Learn more in our guides on how to manually open a garage door and resetting your garage door after pulling the cord.
What you should never do is unplug, remove, tape over, or jumper the sensors so the door closes on its own. Disabling the sensors removes the one thing standing between a closing door and a child or pet. Our article on the dangers of garage door self-repair covers why some shortcuts aren’t worth the risk.
When the Sensors Aren’t the Real Problem
If both sensor lights are solid and steady but the door still reverses or won’t close, the sensors are doing their job. Look at these instead:
- Travel limit or force settings. If the opener thinks the floor is higher than it really is, or the close force is set too low, the door may reverse before it touches down.
- Binding tracks or rollers. A bent track or worn rollers create drag that the opener reads as an obstruction. See our guide to handling garage door track repairs.
- A broken spring or cable. If the door suddenly feels very heavy, don’t keep running the opener. Spring and cable work should always be done by a pro.
- Cold-weather stiffness. During North Texas freeze events, thickened lubricant and stiff weatherstripping can make a door struggle. Learn more about why garage doors stop working in cold weather.
For a broader checklist, see what to do when your garage door won’t close.
When to Call a Professional
Call a garage door technician if:
- You’ve worked through all seven fixes and the sensor lights still won’t come on or hold steady.
- The wiring is damaged in a spot that’s hard to reach or you’d rather not splice it yourself.
- The opener’s lights are dead or it won’t respond at all.
- The door fails the safety reversal test, closes crooked, or slams down.
- You suspect a broken spring, cable, or bent track.
- Your door is stuck open and you can’t secure your home. That’s a situation for emergency garage door repair. Not sure if it qualifies? Here’s what counts as a garage door emergency.
Our garage door sensor repair service diagnoses the real cause, whether it’s alignment, wiring, the sensors, or the opener, and fixes it the same visit whenever possible. Sensor trouble is often a sign that other parts need attention, which is why every service call includes a complimentary 32-point safety inspection. Explore all of our garage door repair services.
How to Keep Your Sensors Working
- Test monthly. The CPSC recommends checking your opener’s safety features every 30 days. Wave an object through the beam as the door closes, and place a 2×4 flat in the door’s path to confirm it reverses on contact.
- Wipe the lenses whenever you sweep the garage.
- Keep a clear zone around both sensors so bins, bikes, and tools don’t get parked against them.
- Check the wing nuts every few months and snug them if they’ve worked loose.
- Look at the wiring after any garage project, especially if anyone used a staple gun near the door frame.
For a complete routine, use our 10-point garage door inspection checklist or schedule a professional garage door inspection.
Frequently Asked Questions
Why is my garage door sensor light blinking?
A blinking sensor light almost always means the beam between the two sensors is broken. The most common causes are misalignment, a dirty lens, something in the beam path, or direct sunlight hitting the receiving sensor. On LiftMaster and Chamberlain models the green receiving light blinks; on Genie models the red sending light blinks.
Can I bypass my garage door sensors?
You can close the door temporarily by holding the wall button down or by using the manual release, but you should never disconnect, remove, or tape over the sensors as a permanent fix. Federal safety rules have required external entrapment protection on residential openers made since 1993, and the sensors exist to stop the door from closing on a person or pet.
How do I reset my garage door sensors?
Garage door sensors don’t have a reset button. Unplugging the opener for about 30 seconds and plugging it back in can clear a temporary glitch, but if the lights don’t come back steady, the sensors need cleaning, realignment, or a wiring repair.
Why does my garage door reverse when nothing is in the way?
If the sensor lights are steady and the door still reverses, the sensors probably aren’t the cause. The opener’s close-force or travel limit settings may need adjusting, or the door may be binding on a bent track, worn rollers, or a broken spring. Those issues are best handled by a technician.
Are garage door sensors universal?
No. Safety sensors are generally designed to work with a specific brand and family of openers, so a replacement pair needs to be compatible with your opener’s make and model. Check your opener’s manual or the label on the motor unit before buying replacement sensors.
Can rain or humidity affect garage door sensors?
Yes. Condensation or water droplets on the lens can scatter the beam, and moisture can corrode wire connections over time. Wipe the lenses dry and look for corroded terminals if trouble starts after a storm or a humid stretch.
Get Reliable Garage Door Sensor Repair
Most garage door sensor problems can be fixed in minutes once you know what the lights are telling you: clear the path, clean the lenses, beat the sun glare, and realign. When the issue turns out to be wiring, a failed sensor, or something deeper in the opener or door, a trained technician can track it down fast and make sure your door’s safety system is working the way it should.
Denton Overhead Door is a locally owned, family-operated garage door company. We offer free estimates, no trip fees, no hidden fees, and 24/7 emergency service. We repair garage door sensors and openers for homeowners in Denton, Flower Mound, Lewisville, Southlake, Trophy Club, Little Elm, and across our full North Texas service area. Request your free estimate today.
Categorised in: Garage Door Maintenance, Garage Door Repair