






How to Align Garage Door Sensors: Step-by-Step Guide
Short answer: To align garage door sensors, find the receiving sensor (the one with the green light), loosen its wing nut or mounting screw, and slowly pivot it until it points straight at the sending sensor and the green light glows steady instead of blinking. Tighten it back down, make sure both sensors sit at the same height about 4 to 6 inches off the floor, and test the door. If a sensor was knocked far out of place, run a string between the two lenses and use a level to line them up exactly.
Key Takeaways
- Misaligned sensors are the most common reason a garage door starts to close and then reverses with nothing in the way.
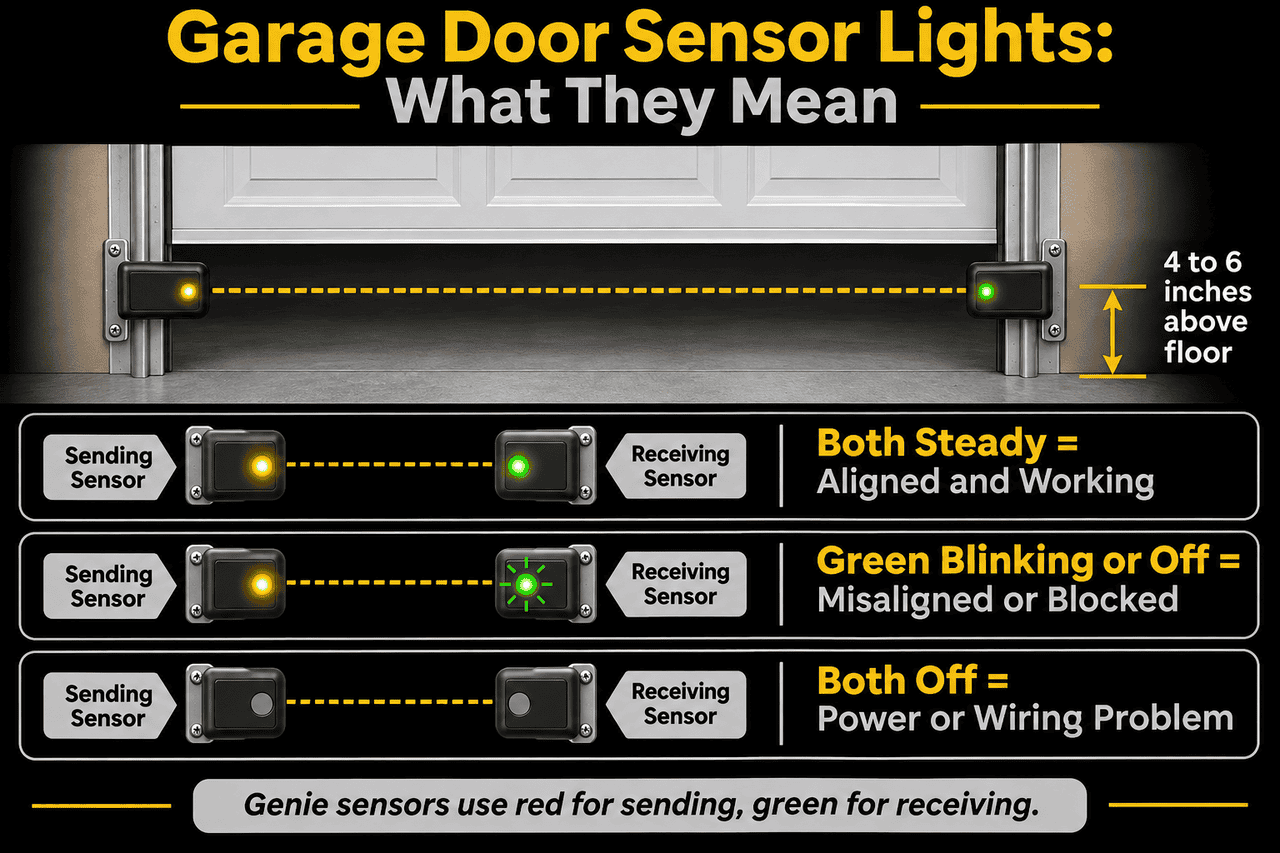
- Steady lights on both sensors mean they’re aligned. A blinking, dim, or dark light on the receiving sensor means the beam isn’t connecting.
- Light colors vary by brand: LiftMaster and Chamberlain use amber (sending) and green (receiving), while Genie uses red (sending) and green (receiving).
- The U.S. Consumer Product Safety Commission recommends mounting photo eyes 4 to 6 inches above the floor.
- Always test the door after realigning, including the reversal test, before trusting it with kids, pets, or vehicles.
- If the lights won’t hold steady after alignment, the issue is usually a dirty lens, sun glare, or damaged wiring, not alignment.
Table of Contents
- What Garage Door Sensors Do and Why Alignment Matters
- Signs Your Garage Door Sensors Are Out of Alignment
- How to Read the Sensor Lights by Brand
- Tools You’ll Need
- How to Align Garage Door Sensors Step by Step
- How to Test Your Door After Aligning the Sensors
- Why Garage Door Sensors Keep Falling Out of Alignment
- When Alignment Isn’t the Real Problem
- When to Call a Garage Door Technician
- Frequently Asked Questions
- Get Your Garage Door Closing Again
What Garage Door Sensors Do and Why Alignment Matters
Your garage door safety sensors (also called photo eyes or safety reversing sensors) are the two small units mounted near the bottom of each door track. One sensor sends an invisible infrared beam across the opening. The other receives it. As long as the beam connects, the opener knows the doorway is clear. The moment something breaks that beam while the door is closing, the opener stops and sends the door back up.
That’s not a convenience feature. After a string of child deaths under automatic doors, the U.S. Consumer Product Safety Commission required residential openers made on or after January 1, 1993 to include external entrapment protection such as an electric eye. That’s why your opener simply refuses to close the door when the sensors can’t see each other. A misaligned sensor looks exactly like a blocked one to the opener.
The good news: because the sensors only need to point at each other, realigning them is one of the few garage door fixes most homeowners can safely handle on their own.
Signs Your Garage Door Sensors Are Out of Alignment
Misalignment rarely announces itself directly. Instead, you’ll notice one or more of these symptoms:
- The door starts to close, then stops and reverses even though nothing is in the way.
- The door won’t close from the remote or keypad at all.
- The lights on the opener motor blink or flash when you try to close the door.
- The green light on the receiving sensor is blinking, flickering, dim, or completely off.
- The door only closes when you press and hold the wall button.
- The problem comes and goes, often at the same time of day.
On many LiftMaster and Chamberlain openers, the main opener lights flash 10 times when there’s a safety sensor issue. If you see that pattern, start with alignment.
How to Read the Sensor Lights by Brand
Before you touch a single screw, look at the indicator lights. They tell you which sensor is sending, which is receiving, and whether the beam is connecting. Colors differ by manufacturer:
| Brand | Sending Sensor | Receiving Sensor | What Misalignment Looks Like |
|---|---|---|---|
| LiftMaster / Chamberlain | Amber light | Green light | Amber stays solid; green blinks, flickers, or goes dark |
| Genie (Safe-T-Beam) | Red light | Green light | Red light blinks in a repeating pattern; green may stay on |
Genie works a little differently. According to Genie’s own Safe-T-Beam diagnostic chart, a red source light that blinks twice and pauses, while the green light stays on, points to a beam that isn’t aligned or is obstructed. If you have another brand, check the label on the back of the sensors or your opener manual. The same rule applies everywhere: both lights steady means aligned.
If both lights are completely off, alignment isn’t your problem. That points to a power or wiring issue, which we cover in our guide to troubleshooting garage door sensors.
Tools You’ll Need
- A flathead or Phillips screwdriver, or just your fingers for wing nuts
- A small level (a torpedo level works well)
- String or twine long enough to span your garage door opening
- Painter’s tape
- A soft microfiber cloth
- A tape measure
- A 2×4 board for the reversal test
How to Align Garage Door Sensors Step by Step
Start with Method 1. It fixes most alignment problems in a few minutes. Use Method 2 if a sensor was bumped hard by a car, lawn mower, or trash can, or if Method 1 doesn’t give you a steady light.
Safety first: Keep the door fully open or fully closed while you work, and make sure no one presses the remote or wall button. You’ll be working at floor level right under the door’s path.
Method 1: The Quick Wing-Nut Adjustment
- Clear the path. Move anything sitting between the sensors: trash cans, bikes, boxes, even a broom leaning against the track. Look for cobwebs hanging in front of the lenses, too.
- Wipe both lenses. Use a dry microfiber cloth. Dust and spider webs can scatter the beam and make sensors look misaligned when they aren’t.
- Identify the receiving sensor. It’s the one with the green light. This is usually the one you’ll adjust.
- Loosen the wing nut or mounting screw. Loosen it just enough that the sensor can pivot by hand. Don’t remove it.
- Slowly pivot the sensor. Aim it directly across the opening at the sending sensor. Move it in small increments and watch the light. Stop when the green light glows solid and steady with no flicker.
- Tighten it down. Hold the sensor still while you snug the wing nut. Recheck the light afterward, because tightening can nudge the sensor slightly.
- Repeat on the sending sensor if needed. If the green light still won’t settle, make the same small adjustment on the sending sensor.
Chamberlain’s own support guidance follows the same process: realign until both sensor lights glow steadily, then test with the remote. If that doesn’t work, loosen both sensors and realign them together.
Method 2: The String-and-Level Method
When a sensor bracket gets bent or knocked loose, eyeballing it won’t get you close enough. This method lines both sensors up physically before you fine-tune with the lights.
- Unplug the opener. Disconnect the opener from the outlet while you reposition the brackets so the door can’t be activated.
- Measure the height of each sensor. Measure from the floor to the center of each lens. They should match, and per the Consumer Product Safety Commission, an electric eye should sit 4 to 6 inches above the floor. If either one is higher, slide its bracket down.
- Run a string between the lenses. Tape one end of the string to the center of one lens. Pull it taut across the opening and tape it to the center of the other lens.
- Level the string. Set your level on the string. Adjust the sensor brackets up or down until the bubble is centered and the string touches the center of both lenses.
- Square each sensor to the string. Each lens should face straight down the string, not angled toward the door or the wall.
- Tighten everything. Tighten the bracket screws and wing nuts, then gently push on each sensor to make sure it doesn’t move.
- Remove the string and restore power. Plug the opener back in and check the lights. Make a final small adjustment with the wing nut if the receiving light isn’t perfectly steady.
How to Test Your Door After Aligning the Sensors
Don’t stop at “the light is green.” Confirm the whole safety system is working:
- Close the door with the remote. Not the wall button. The door should travel all the way down without reversing.
- Test the beam. Open the door, start closing it, and pass an object (like a broom handle) through the beam. The door should stop and reverse.
- Run the reversal test. The CPSC recommends placing a 2×4 flat on the floor in the door’s path. When the door touches it, the door should reverse. If it doesn’t, stop using the opener and have it serviced.
The CPSC recommends testing your opener’s safety features every 30 days. It takes two minutes and pairs well with the other checks in our garage door inspection checklist.
Why Garage Door Sensors Keep Falling Out of Alignment
If you’re realigning the same sensors every few weeks, something is moving them. The usual suspects:
- Bumps and kicks. Car bumpers, mowers, bikes, and kids’ toys hit the sensors more often than people realize.
- Loose hardware. Wing nuts that were never fully tightened slowly work loose from door vibration.
- Bent brackets or tracks. If the bracket or the bottom of the track is bent, the sensor won’t stay put. A shifting track usually needs garage door track repair, not just another adjustment.
- Cleaning day. Sweeping, pressure washing, or rearranging storage often knocks sensors a few degrees off.
North Texas Sun Glare
Here in Denton County, we see a lot of “misaligned” sensors that are actually lined up perfectly. The problem is the sun. When strong, low-angle light shines straight into the receiving sensor, it can drown out the infrared beam. The result is a door that refuses to close for an hour or two every afternoon, often on west-facing garages, and then works fine after sundown.
Manufacturers know about this. Genie advises keeping the green receiving sensor out of direct sunlight. Chamberlain’s troubleshooting steps suggest switching the positions of the sensors if the door still won’t close. In practice, that means moving the receiving sensor to the side of the door that stays in shade, or adding a small sun shield over the receiver.
Two-Door Garages and Crosstalk
If you have two or three doors side by side, the sensors on one door can pick up the beam from the door next to it. Genie recommends mounting sensors on adjacent doors so the matching units sit back to back: both sending sensors or both receiving sensors facing away from each other. That way no beam crosses into the wrong door’s receiver.
When Alignment Isn’t the Real Problem
If you’ve aligned the sensors, the lights are steady, and the door still won’t close, look elsewhere:
- One or both lights won’t come on at all. That’s a wiring or power problem, often a staple pinched through the low-voltage wire or a loose terminal on the opener.
- The receiving light flickers no matter how you aim it. The lens may be cracked or fogged, or the sensor itself may be failing.
- The lights are steady but the door still reverses. The opener’s force or travel limit settings may be off, or the door may be binding on a track, roller, or spring.
We walk through each of these step by step in our guide on how to fix garage door sensors, including dirty lenses, damaged wiring, and sunlight interference. If the door won’t close for reasons that have nothing to do with the sensors, see what to do when your garage door won’t close.
When to Call a Garage Door Technician
Sensor alignment is a safe DIY job. These situations are not:
- The door is crooked, off its track, or slams down when it closes.
- You hear a loud bang and the door suddenly feels very heavy. That’s typically a broken spring, which calls for professional garage door spring repair.
- The door fails the 2×4 reversal test.
- You’ve realigned the sensors and the problem keeps coming back.
- Wires are cut, chewed, or corroded and you’re not comfortable working on them.
Our garage door sensor repair service covers alignment, wiring, and sensor replacement. Every service call includes a complimentary 32-point safety inspection, so we’ll catch anything else that’s wearing out while we’re there. If you’re not sure whether a repair is safe to tackle yourself, our guide on deciding between DIY and a professional repair can help.
Frequently Asked Questions
How do I know if my garage door sensors are aligned?
When both sensors show a steady, solid indicator light, they’re aligned and the beam is connecting. On LiftMaster and Chamberlain openers, that means a solid amber light on the sending sensor and a solid green light on the receiving sensor. A blinking, dim, or dark receiving light means the beam isn’t connecting.
Should both garage door sensor lights be green?
Not usually. Most LiftMaster and Chamberlain sensors use an amber light on the sending sensor and a green light on the receiving sensor. Genie Safe-T-Beam sensors use a red light on the sending unit and a green light on the receiving unit. What matters is that both lights are steady, not that they match.
How high should garage door sensors be off the ground?
The U.S. Consumer Product Safety Commission says photo eye sensors should be installed 4 to 6 inches above the floor. Mounting them higher can let a small child or pet slip under the beam, so if your sensors have crept up, lower both brackets to the same height within that range.
Can sunlight make garage door sensors act misaligned?
Yes. Direct sun shining into the receiving sensor can overpower the infrared beam, so the door reverses even though the sensors are lined up. It’s common on west-facing garages in the late afternoon. Shading the receiver or swapping the two sensors so the receiver sits on the shady side usually solves it.
Why will my garage door close when I hold the wall button but not with the remote?
Holding the wall button down is a built-in override that lets you close the door when the safety sensors can’t see each other. If the door only closes this way, your sensors are almost certainly blocked, dirty, or misaligned. Use the override to secure your home, then realign the sensors.
How long does it take to align garage door sensors?
A quick wing-nut adjustment usually takes under 10 minutes. If a sensor bracket was bent or knocked loose and you need the string-and-level method, plan on 20 to 30 minutes. If you’ve spent longer than that and the light still won’t hold steady, the problem is probably wiring or a failing sensor rather than alignment.
Get Your Garage Door Closing Again
Most of the time, aligning garage door sensors comes down to a clean lens, a loosened wing nut, and a steady green light. Take five minutes to try it, test the door afterward, and add a monthly safety check to your routine. If the lights won’t settle, the door still reverses, or something looks bent or broken, let a local technician take it from there.
Denton Overhead Door is a locally owned, family-operated garage door company offering free estimates, no trip fees, and 24/7 emergency garage door repair. We fix sensors and every other part of your door and opener for homeowners in Denton, Flower Mound, Lewisville, Highland Village, Little Elm, Frisco, and throughout all of our North Texas service areas. Schedule your sensor repair today.
Categorised in: Garage Door Maintenance, Garage Door Repair